# Node.js +Koa2 打造web框架(一)
nvm管理不同的node版本,koa官方文档 (opens new window)
node.js的能力与应用
- 脱离浏览器运行JS
- NodeJS Stream (前端工程化基础)
- 服务端API
- 作为中间层
koa的特点:洋葱圈模型,精简,一般需要二次开发,因此定制化能力强,可以根据开发者的喜好和习惯形成非常好用的高级KOA.
# Koa2 与异步编程
首先初始化npm的项目配置文件npm init,然后使用npm i koa进行koa的安装,建立koa的入口文件,首先需要导入koa
const Koa = require("Koa");
JavaScrip模块导入导出的几种方式
common JS导入语句,即上述的require语句ES6导入模块或包,使用import from *语句- AMD形式导入
由于Node中无法直接使用ES6及以上的语法,需要使用babel插件进行编译
此时我们实例化Koa,像这种实例化的对象我们一般称之为应用程序对象,其特点是在对象上面存在大量的中间件,当我们使用其listen方法时,就可以启动koa
const Koa = require("Koa");
const app = new Koa(); //应用程序对象
app.listen(3000); //3000是未被暂用的端口号
2
3
在终端中执行app.js文件,此时终端处于未报错,阻塞状态时即说明以成功启动。
# 中间件
什么是中间件
- 中间件可以暂时理解为函数,包含一定的功能。通过app.use进行注册。
- 中间件的注册存在顺序关系。调用每个中间件存在两个函数,
ctx表示上下文,next就表示下一个中间件。
如果想调用注册的中间件,则需要前端发送HTTP请求,最简单的方式是从浏览器中发送:
function test() {
  console.log("test");
}
app.use(test);
2
3
4
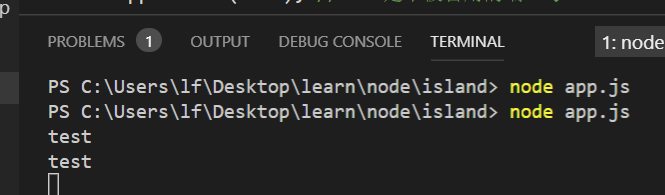
这是开启koa,并访问本地端口http://localhost:3000/,则会打印出test
app.use((ctx, next) => {
  //ctx 上下文  next下一个中间件函数
  console.log("hello,7yue");
  // 调用下一个中间件函数
  next();
});

app.use((ctx, next) => {
  console.log("hello,8yue");
});
2
3
4
5
6
7
8
9
10
此时重新请求,开启koa,输出结果如下

如果不使用next调用下一个中间件,则不会打印8yue。
# 洋葱模型
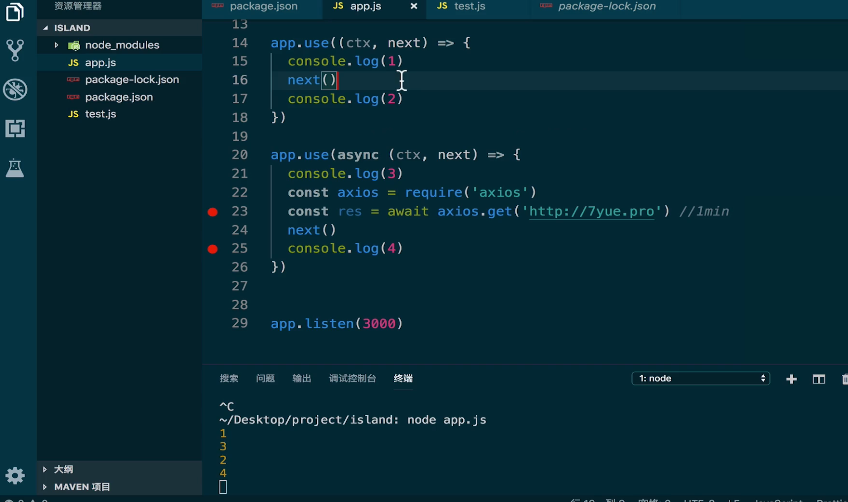
我们将上面的代码进行修改一下:
app.use((ctx, next) => {
  //ctx 上下文  next下一个中间件函数
  console.log(1);
  // 调用下一个中间件函数
  next();
  console.log(2);
});

app.use((ctx, next) => {
  console.log(3);
  next();
  console.log(4);
});
2
3
4
5
6
7
8
9
10
11
12
13
则输出结果为1,3,4,2.这里就是一个洋葱模型,使用next将一个函数分隔成上下两部分,简单的图示如下
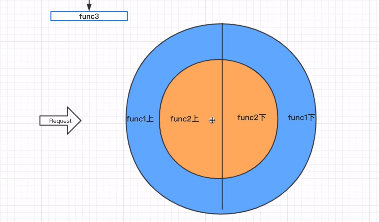
关于洋葱模型的具体图片,可查看此文档 (opens new window)
小结:在中间件的函数前面需要加上async,在next()前面需要加上await
app.use(async (ctx, next) => {
  //ctx 上下文  next下一个中间件函数
  console.log(1);
  // 调用下一个中间件函数
  await next();
  console.log(2);
});
2
3
4
5
6
7
这个可以确保中间件是万无一失的,因为node.js大部分是异步编程。
如果不加上async和await我们很难保证中间件一定是按照洋葱模型的模式执行
# await特点
js是单线程的,有宏任务和微任务的区别。单线程是不可能让线程不工作的,只是会把任务挂起。
await我们可以简单将其认为是求值关键字,对返回的promise对象成功时候的结果进行计算转换,其后面可以任意跟上一个表达式,而不仅仅是promiseconst a = await 100*100;//100001阻塞线程这里是指await语句下所有代码被放进了微任务队列,其重大的意义是将异步调用变为同步调用。一般的异步操作有: 对资源、读文件、发送HTTP及操作数据库等,例如当我们不使用和使用
await时,其请求时间的差别如下:app.use(async (ctx, next) => { // console.log(3); //引用axios库 const axios = require("axios"); const start = Date.now(); //请求网址 //const res = axios.get("http://7yue.pro"); const res = await axios.get("http://7yue.pro"); const end = Date.now(); console.log(end - start); // console.log(4); });1
2
3
4
5
6
7
8
9
10
11
12
这是由于使用await会阻塞线程,等待异步调用的结果返回后,才能执行后面的代码。
# async意义
如果一个函数前加上async关键字,则函数返回的结果会被强制包装成promise对象
async function fun() {
  console.log("abc");
}
console.log(fun());
2
3
4

中间件函数前面为什么要加上async
因为中间件函数内部使用await,如果不加上async,则会报错。
async和await被称为异步的终极解决方案。
# 为什么一定要保证洋葱模型
如果不加上async和await,koa的中间件就不一定会按照洋葱模型的顺序执行,如下图所示:
虽然node是单线程,但是其可以快速切换执行代码片段,看起来像并行执行,因此node是可以处理并发的。
保证按洋葱模型的顺序执行的必要条件:
- 中间件必须全部使用async函数和await next (),
- 如果有使用普通函数的中间件,其next的async函数中间件包括异步获取数据的,在await阻塞线程获取异步数据时,会执行外层普通函数中间件的next之后的语句。
- 当async函数执行过程中碰到await时,会立刻返回一个promise,等待await执行结果,再执行下面代码。
- promise属于异步任务,它会等待所有宏任务执行(主线程)执行完毕后才会执行。
只有按照洋葱模型方式执行代码,你才能知道后续所有的中间件都已经执行,其以next()函数为界限,之前的代码表名中间件还没有执行,next()之后的代码表示中间件都已执行。
多个中间见参数传递
- 通过return的当时进行传递(当使用大量第三方插件时,无法准确的获取)
- 利用
ctx上下文参数
const Koa = require('koa')
// 应用程序对象
const app = new Koa()

app.use(async (ctx, next) => {
  //next()
  await next()
  console.log(ctx.r)//100000
})

app.use(async (ctx, next) => {
  const res = await 100 * 1000
  ctx.r = res
})

app.listen(3000) // 3000是未被暂用的端口号
2
3
4
5
6
7
8
9
10
11
12
13
14
15
16
如果不加async和await,其不能保证中间件的执行顺序按洋葱模型执行,因此会打印出undefined
# koa路由系统改造
# 路由系统
如果要获得请求的路径和方法等可以参考官方文档 (opens new window)。ctx.与request.是等效的,浏览器默认的请求就是GET请求
const Koa = require('koa')
// 应用程序对象
const app = new Koa()
app.use(async (ctx, next) => {
console.log(ctx.method)
console.log(ctx.path)
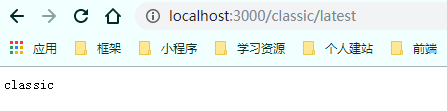
if (ctx.method == 'GET' && ctx.path == '/classic/latest') {
ctx.body = 'classic' //将最终结果返回到客户端
}
//调用下一个中间件
await next()
})
app.listen(3000) // 3000是未被暂用的端口号
2
3
4
5
6
7
8
9
10
11
12
13
14
注意这里必须要将返回的值赋值到ctx.body中,否则客户端无法接收,如果要返回json格式的数据,则将数据以JavaScript对象的形式赋值给ctx.body,koa内部会自动将其转换为json数据格式
ctx.body = {key:'classic'}// {"key":"classic"}
上面是一种简易的路由,在koa中我们一般使用koa-router这个路由中间件 (opens new window)
# 引入koa-router
const Router = require('@koa/router')// 引入koa-router
const Koa = require('koa') // 引入路由
// 应用程序对象 中间件
const app = new Koa()
const router = new Router()// 实例化路由
router.get('/classic/latest', (ctx,next) => {
  ctx.body = {key:'classic'}
})

app.use(router.routes())// 将路由注册到中间件上
2
3
4
5
6
7
8
9
10
Restful API 的主要四个操作: get 查询,post 新增,put修改 以及delete 删除
# 主题与模型划分
对于一个项目,我们应该对路由按照主题进行拆分,将路由分别写到不同的文件中。
基本主题的划分逻辑,我们可以根据数据类型进行划分,好的主题划分,数据库的设计也相对而言比较简单,主题的划分是渐进式的,首先划分的是核心主题,后期随着开发慢慢补充数据
# 多Router拆分路由
Api版本:一般是业务变更,需要考虑到老版本的兼容性,因此需要设计多个api版本,版本越多,成本越高。
api版本号的携带的三种方式
- 路径中:/v1/classic/latest
- 查询参数:/classic/latest?version=v1
- 通过http中的header携带
代码应当遵循开闭原则修改关闭,扩展开放
注意避免循环引用,因为nodejs对循环引用不会报错,很难排查问题。应该是上层调用下层,而不能反过来调用。
我们可以在每个路由文件中编写路由然后在入口文件引入注册即可
//book.js路由文件
const Router = require('@koa/router')
const router = new Router()
router.get('/v1/book/latest', (ctx, next) => {
  ctx.body = {
    key:'book'
  }
})
module.exports = {
  book:router // 如果键名与值相同,则可以简写为值名 router
}

// classic.js文件
const Router = require('@koa/router')
const router = new Router()
router.get('/v1/classic/latest',(ctx, next) => {
  ctx.body={
    key:'classic'
  }
})
module.exports= router

//app.js  入口文件
const Koa = require('koa') // 引入路由
const {book} = require('./app/api/v1/book') // 如果以对象的形式导出 则引入也必须为对象
const classic = require('./app/api/v1/classic')
// 应用程序对象 中间件
const app = new Koa()

app.use(book.routes())// 将路由注册到中间件上
app.use(classic.routes())

app.listen(3000) // 3000是未被暂用的端口号
2
3
4
5
6
7
8
9
10
11
12
13
14
15
16
17
18
19
20
21
22
23
24
25
26
27
28
29
30
31
32
33

# nodemon自动重启Server
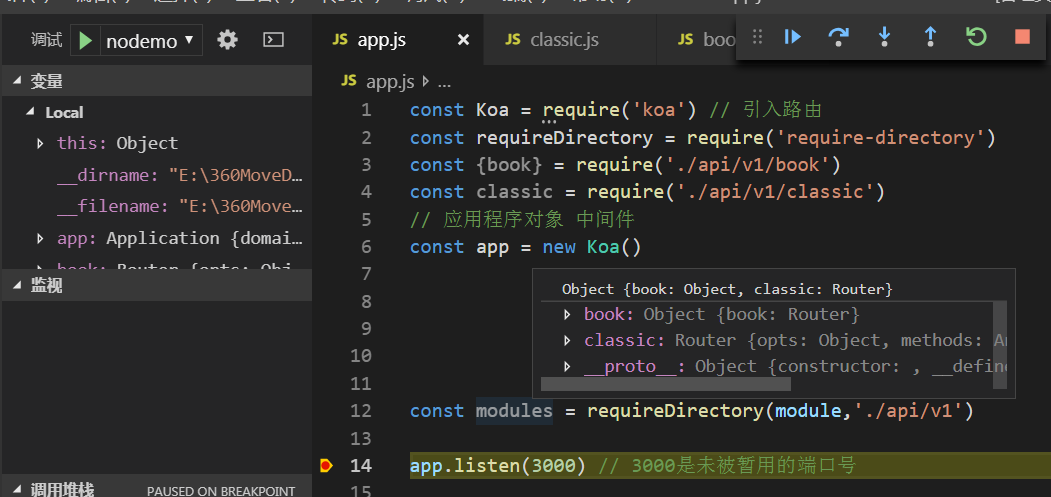
使用vscode断点调试时,在需要调试的地方打上断点,然后按F5即进入断点调试,此时就与平时断点调试步骤一样。
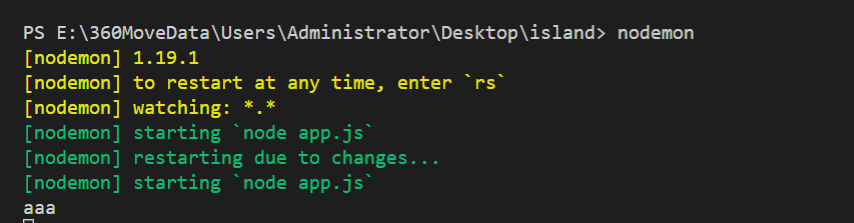
安装nodemon用于自动重启Server,建议全局安装,直接输入nodemon即可启动
npm i nodemon -g
如果安装在当前项目文件,则有两种方法可以启动nodemon
- 使用命令
npx nodemon - 在package.json文件中添加脚本,使用设置的快捷键启动
此时我们只要修改文件后进行保存,nodemon就会自动重启node服务
# vscode+nodemon调试配置
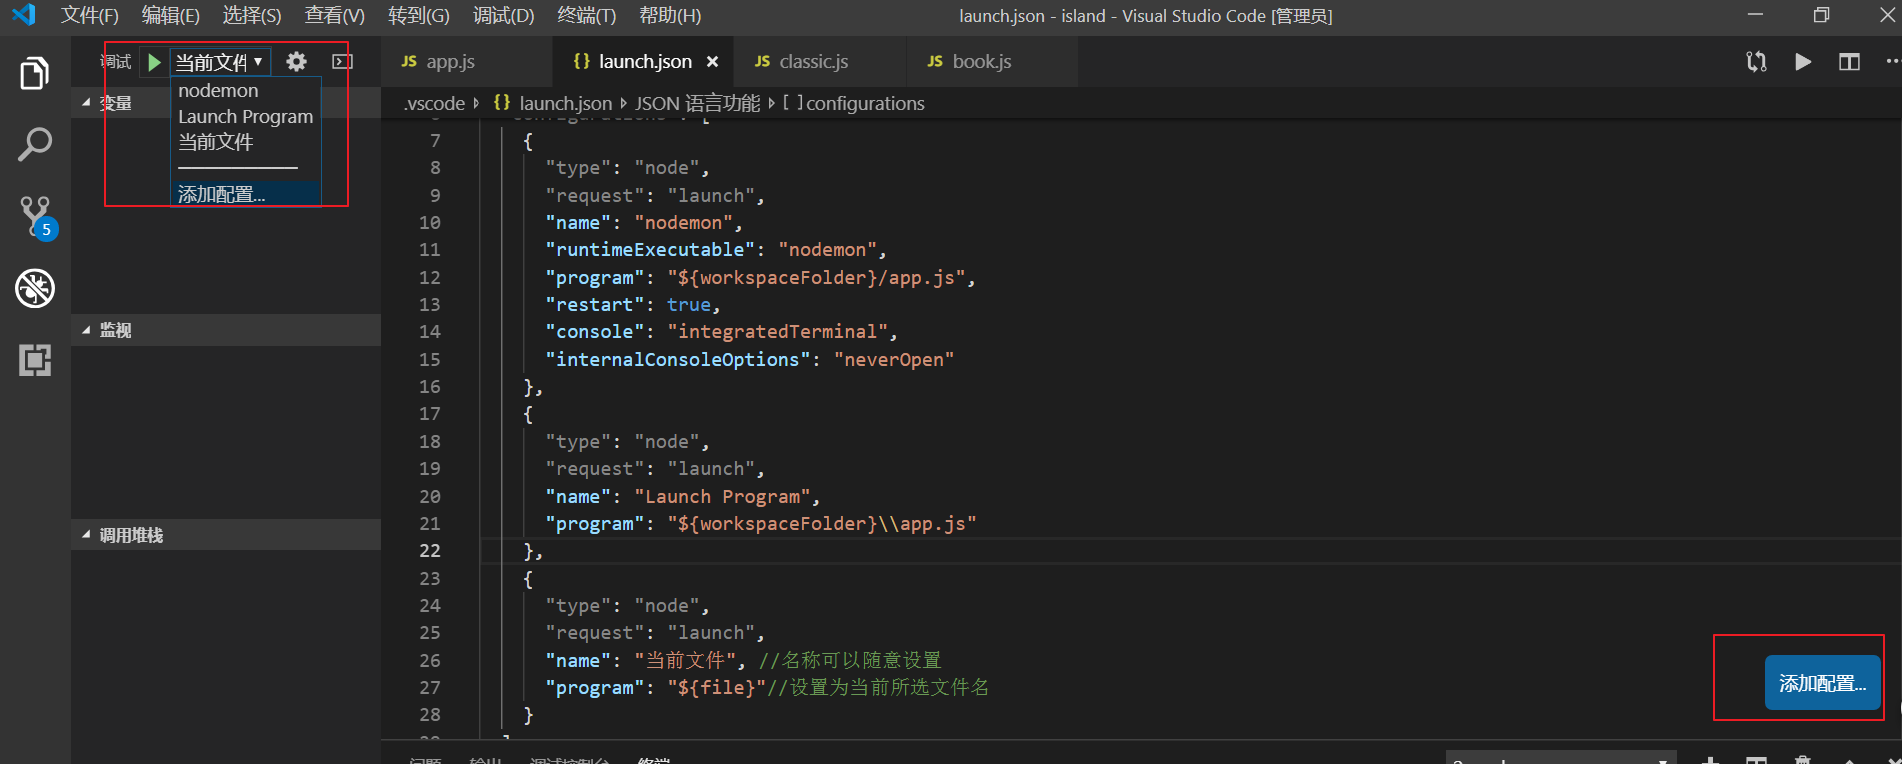
首先我们需要生成配置文件,如下图所示我们即可在项目文件中看到生成的配置文件.vscode/launch.json
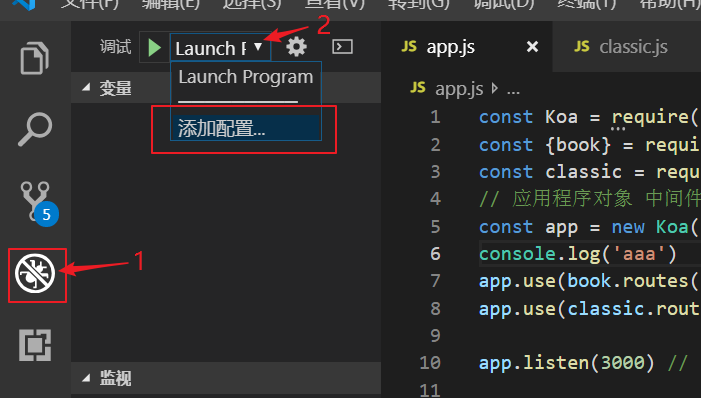
在配置文件中默认的启动文件是app.js文件,我们可以进行添加,使其拥有多种启动方式,其中点击添加配置选择nodemon可以自动帮我们配置nodemon的调试配置,同时,由于默认进入的是入口文件,我们还需配置在当前文件即可断点调试的配置
{
  // Use IntelliSense to learn about possible attributes.
  // Hover to view descriptions of existing attributes.
  // For more information, visit: https://go.microsoft.com/fwlink/?linkid=830387
  "version": "0.2.0",
  "configurations": [
    {
      "type": "node",
      "request": "launch",
      "name": "nodemon",
      "runtimeExecutable": "nodemon",
      "program": "${workspaceFolder}/app.js",
      "restart": true,
      "console": "integratedTerminal",
      "internalConsoleOptions": "neverOpen"
    },
    {
      "type": "node",
      "request": "launch",
      "name": "Launch Program",
      "program": "${workspaceFolder}/app.js"
    },
    {
      "type": "node",
      "request": "launch",
      "name": "当前文件", //名称可以随意设置
      "program": "${file}"//设置为当前所选文件名
    }
  ]
}
2
3
4
5
6
7
8
9
10
11
12
13
14
15
16
17
18
19
20
21
22
23
24
25
26
27
28
29
30
此时,选择使用nodemon的调试配置,即可实现vscode+nodemon的调试配置
# requireDirectory实现路由自动注册
首先我们需要安装require-directory的安装包,其使用文档 (opens new window)
npm i require-directory
然后在入口文件引入即可,然后通过调用,填入相关参数(module(固定),模块路径)即可将路径下所有的模块添加到modules变量里
其还可以接收第三个参数,这是一个函数,相当于一个回调函数,否则就需要我们进行循环判断导出的是否为路由模块。
const Router = require('@koa/router') // 引入路由
const requireDirectory = require('require-directory')
const Koa = require('koa') // 引入koa
// 应用程序对象 中间件
const app = new Koa()

requireDirectory(module, './app/api/v1', {
  visit: whenLoadModule
})

function whenLoadModule(obj) {
  // 如果不是以对象形式导出
  if (obj instanceof Router) {
    app.use(obj.routes())
  } else {
    // 判断以对象形式导出的属性中 是否有Router
    for (var i in obj) {
      if (obj[i] instanceof Router) {
        app.use(obj[i].routes())
      }
    }
  }
}
// 只传入两个参数的情况
// const modules = requireDirectory(module,'./app/api/v1')

// for (var r in modules) {
//   if (r instanceof Router) {
//     app.use(r.routes())// 注册路由
//   }
// }

app.listen(3000) // 3000是未被暂用的端口号
2
3
4
5
6
7
8
9
10
11
12
13
14
15
16
17
18
19
20
21
22
23
24
25
26
27
28
29
30
31
32
33
# 初始化管理器与Process.cwd
由于入口文件不应放置太多的代码,因此我们需要对其重构,将其中的部分代码分离出去,首先我们需要建立一个core文件夹,用于放置初始化文件和函数文件,这里我们新建一个初始化文件init.js,在里面创建初始化管理器类,具体代码如下
/core/init.js

const requireDirectory = require('require-directory') // 引入文件夹管理插件
const Router = require('@koa/router') // 引入路由
// 初始化管理器类
class InitManager{
  // 设置入口方法
  static initCore(app) {
    // 将传入的参数设置在类的属性上 或者通过函数传参的方式传递
    InitManager.app = app
     // 调用类中的方法
     InitManager.initRouter()
     //InitManager.initRouter(app)
  }

  // 设置初始化路由方法 其中[app]代表使用函数传参的方式进行app的相关调用
  static initRouter([app]) {
    // 路由自动注册函数 param: 模块 路径 及模块引入后的回调函数
    requireDirectory(module, '../app/api', {
      visit: whenLoadModule
    })
    // 路由注册函数
    function whenLoadModule(obj) {
      if (obj instanceof Router) {
        // 将路由注册在中间件
        InitManager.app.use(obj.routes())
        // app.use(obj.routes())
      } else {
        // 通过对象的形式导出模块
        for (let i in obj) {
          if (obj[i] instanceof Router) {
            InitManager.app.use(obj[i].routes())
            // app.use(obj[i].routes())
          }
        }
      }
    }
  }
}

// 导出模块
module.exports = InitManager
2
3
4
5
6
7
8
9
10
11
12
13
14
15
16
17
18
19
20
21
22
23
24
25
26
27
28
29
30
31
32
33
34
35
36
37
38
39
40
41
42
入口文件代码如下:
/app.js

const Koa = require('koa') // 引入koa
const InitManager = require('./core/init') // 引入初始化管理器
// 应用程序对象 中间件
const app = new Koa()
// 调用初始化管理器中的初始化方法
InitManager.initCore(app)

app.listen(3000) // 3000是未被暂用的端口号
2
3
4
5
6
7
8
9
10
由于在调用路由自动注册函数时,需要使用文件路径,这里使用的是硬编码的方式,这是不推荐的,更好的引用方式有以下了两种:
文件路径设置
- 将相关文件位置自行配置文件中
- 通过nodejs提供的绝对路径函数
process.cwd
这里改写文件如下:
  // 当前项目的绝对路径
    let apiDirectory = `${process.cwd()}/app/api`
    // 路由自动注册函数 param: 模块 路径 及模块引入后的回调函数
    requireDirectory(module, apiDirectory, {
      visit: whenLoadModule
    })
2
3
4
5
6
或者使用配置文件
// config.js
const config = {
  apiDirectory: `${process.cwd()}/app/api`
};

module.exports = config;


const path = require('path')
const Config = {
  apiDirectory: path.join(__dirname,'/app/api/v1')
}
module.exports = Config

// init.js
const config = require("../config");
let apiDirectory = config.apiDirectory;
2
3
4
5
6
7
8
9
10
11
12
13
14
15
16
17
# 异步异常与全局异常处理
# 参数获取
常见的参数传递的四种方法
- 在url路径中传参
/v1/:id/latest - 通过在url路径
?之后带查询参数 - 通过
http的body传参 - 通过
http的header传参
而在koa中对应着以下四个方法来获取参数
获取path方式传递的参数
ctx.params获取query方式传递的参数
ctx.request.query获取header方式传递的参数
ctx.request.header获取body方式传递的参数,需要安装
koa-bodyparser中间件,通过ctx.request.body进行获取,具体使用如下//入口文件 app.js const parser = require('koa-bodyparser')// 引入bodyparser 中间件 // 应用程序对象 中间件 const app = new Koa() // 注册中间件 app.use(parser())1
2
3
4
5
6校验参数的作用:防止非法请求,给客户端提供提示
# 异常理论与异常链
首先我们在调用函数时会出现以下两种结果:
- 没有发生异常,正确返回结果
- 发生异常
在函数设计时,我们需要判断出异常,然后进行处理,这里也有两种方式:
return false /null
function fun2() {
  let r = fun3()
  if(!r){}
}

function fun3() {
  return false
}
1
2
3
4
5
6
7
8按照编程规范,应该
throw new Error
console.log(fun3())//success
function fun3() {
  try {
    1/0
  } catch (error) {
    throw error
  }
  return 'success'
}
2
3
4
5
6
7
8
9
这里没有抛出异常,是因为在JavaScript中1/0=infinity,这场情况下的异常链条如下
function fun1() {
  try {
    fun2()
  } catch(error){
    throw error
  }
}

function fun2() {
  try {
    fun3()
  } catch (error) {
    throw error
  }
}

function fun3() {
  try {
    1/a
  } catch (error) {
    throw error
  }
  return 'success'
}
2
3
4
5
6
7
8
9
10
11
12
13
14
15
16
17
18
19
20
21
22
23
24
但最好的是,设计一种机制,可以监听到各种异常,这就需要全局异常处理机制
# 异步异常处理方案
try-catch捕捉异常通常只对同步起作用,对异步操作一般无法捕获
function fun1() {
  try {
    fun2();
  } catch (err) {
    console.log("err");
  }
}

function fun2() {
  setTimeout(() => {
    throw new Error("error");
  }, 1000);
}
fun1();
2
3
4
5
6
7
8
9
10
11
12
13
14
上面代码是一个简单模拟异步操作的过程,结果是直接抛出一个错误,而没有打印出err,这是因为执行setTimeout操作时候,立即就return出去,其中的回调函数可能还没有执行,所以无法捕捉。
因此在异步编程处理的时候,如果某一个函数函数返回的是**promise对象**时,我们就可以使用async及await来处理异步编程,同时在异常链中如果一个函数中使用了async和await,则所有的函数都需使用这两个关键字
async function fun1() {
  try {
    await fun2();
  } catch (err) {
    console.log("err");
  }
}

function fun2() {
  return new Promise((resolve, reject) => {
    setTimeout(function() {
      let r = Math.random();
      if (r < 0.5) {
        reject("error");
      }
    }, 1000);
  });
}
fun1();
2
3
4
5
6
7
8
9
10
11
12
13
14
15
16
17
18
19
简单的异步异常处理方案如上所示,一定要返回的是一个promise对象,当返回错误时,就是输出err,同时注意setTimeout虽然是一个异步函数,但由于其本身只负责执行函数并不返回结果,所以也就无法返回promise,通过promise自身返回的异常,await进行获取时,如果发生错误,可以当作自行抛出了错误。
# 全局异常处理中间件编写
我们通过编写koa的中间件来进行全局异常的监听及返回相关信息。
// ./midewares/exception.js
const catchError = async (ctx, next) => {
  try {
    await next();
  } catch (error) {
    ctx.body = "浏览器错误,请稍后重试";
  }
};
module.exports = catchError;

//app.js文件进行注册
const catchError = require("./middlewares/exception");
app.use(catchError);
//在接口文件抛出错误
/app/api/v1/classic.js
router.get("/v1/classic/latest", (ctx, next) => {
  throw new Exception("error");
  ctx.body = {
    index: "classic"
  };
});
2
3
4
5
6
7
8
9
10
11
12
13
14
15
16
17
18
19
20
21
此时我们在浏览器请求接口时,就会获得返回的错误信息

这里用的是aop编程的思想即这种在运行时,动态地将代码切入到类的指定方法、指定位置上的编程思想就是面向切面的编程。
# 已知错误和未知错误
在实际项目中我们捕捉到的错误不应该直接返回到客户端中,因此需要对错误进行简化,返回给前端清晰明了的错误信息:
http status code即http的请求状态码 (opens new window)msg错误信息字段err_code错误码,自定义的,同时比http请求状态码要丰富request_url当前请求的url
错误分为已知行错误和未知型错误(程序潜在的错误)
已知错误一般是用户传递参数不符合校验规则等错误,未知错误则是无意识的,根本不知道什么地方出现的错误。
# 定义返回异常格式
这里我们以简单的已知错误为例,模拟异常返回需呀携带的参数,首先我们需要实例化一个Error然后在进行抛出
// app/api/v1/classic.js
router.get("/v1/classic/latest", (ctx, next) => {
  if (true) {
    // 实例化错误并设置错误信息
    // const err = new Error();
    // err.message = "this is an error";
    const err = new Error("this is an error");
    // 设置http状态码
    err.status = 400;
    // 设置错误码
    err.errorCode = 10001;
    // 获取的请求的方法及url
    err.requestUrl = `${ctx.method} ${ctx.path}`;
    // 抛出错误
    throw err;
  }
  // ctx.body = {
  //   index: "classic"
  // };
});

// midewares/exception.js
const catchError = async (ctx, next) => {
  try {
    await next();
  } catch (error) {
    // 判断是否存在错误码
    if (error.errorCode) {
      ctx.body = {
        msg: error.message,
        errorCode: error.errorCode,
        requestUrl: error.requestUrl
      };
      ctx.status = error.status;
    }
  }
};
module.exports = catchError;
2
3
4
5
6
7
8
9
10
11
12
13
14
15
16
17
18
19
20
21
22
23
24
25
26
27
28
29
30
31
32
33
34
35
36
37
38
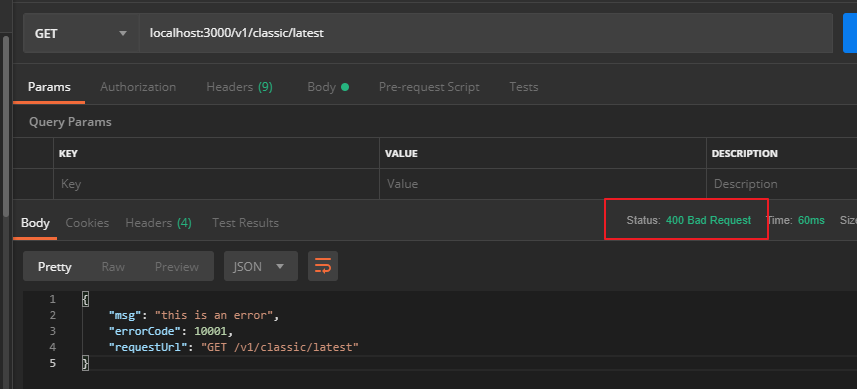
在postman模拟请求可以接收到如下信息
但是这样的写法非常麻烦,因此我们使用面向对象的思想来进行处理错误
# 定义HttpException异常基类
我们将已知错误通过单独HttpException类进行处理,然后在相应地方进行捕获抛出
/core/http-exception.js
// 创建http异常处理类继承Error
class HttpException extends Error {
  constructor(msg = "服务器错误", errorCode = 10000, code = 400) {
    // 调用基类构造函数
    super();
    // 错误信息
    this.msg = msg;
    // 自定义错误码
    this.errorCode = errorCode;
    // http请求状态码
    this.code = code;
  }
}

module.exports = {
  HttpException
};

/middleware/exception.js
// 以对象形式导出,则必须以对象形式导入
const { HttpException } = require("../core/http-exception");
const catchError = async (ctx, next) => {
  try {
    await next();
  } catch (error) {
    // 判断错误是否是已知错误
    if (error instanceof HttpException) {
      ctx.body = {
        msg: error.msg,
        errorCode: error.errorCode,
        requestUrl: `${ctx.method} ${ctx.path}`
      };
      ctx.status = error.code;
    }
  }
};
module.exports = catchError;

/app/api/v1/classic.js
const Router = require("@koa/router");
const router = new Router();
const { HttpException } = require("../../../core/http-exception");
router.get("/v1/classic/latest", (ctx, next) => {
  if (true) {
    const err = new HttpException("this is an afdasr", 10001, 400);
    // 抛出错误
    throw err;
  }
  // ctx.body = {
  //   index: "classic"
  // };
});
module.exports = { classic: router };
2
3
4
5
6
7
8
9
10
11
12
13
14
15
16
17
18
19
20
21
22
23
24
25
26
27
28
29
30
31
32
33
34
35
36
37
38
39
40
41
42
43
44
45
46
47
48
49
50
51
52
53
54
# 特定异常类与global全局变量
由于我们会在判断各种异常时,每次都需要传递参数,这样会有些麻烦,我们可以定义一些常用的异常类,这样就可以直接调用具体的异常类,而不是每次都需要传递新参数
/core/http-exception.js
class ParameterException extends HttpException {
  constructor(msg, errorCode) {
    super();
    console.log(msg);
    console.log(errorCode);
    this.code = 400;
    this.msg = msg || "参数错误";
    this.errorCode = errorCode || 10001;
  }
}

module.exports = {
  HttpException,
  ParameterException
};
/app/api/v1/classic.js

const Router = require("@koa/router");
const router = new Router();
const { ParameterException } = require("../../../core/http-exception");
router.get("/v1/classic/latest", (ctx, next) => {
  if (true) {
    const err = new ParameterException();
    // 抛出错误
    throw err;
  }
  // ctx.body = {
  //   index: "classic"
  // };
});
module.exports = { classic: router };

/middleware/exception.js
const { HttpException, ParameterException } = require("../core/http-exception");
const catchError = async (ctx, next) => {
  try {
    await next();
  } catch (error) {
    // 判断错误是否是已知错误
    if (error instanceof ParameterException) {
      ctx.body = {
        msg: error.msg,
        errorCode: error.errorCode,
        requestUrl: `${ctx.method} ${ctx.path}`
      };
      ctx.status = error.code;
    }
  }
};
module.exports = catchError;
2
3
4
5
6
7
8
9
10
11
12
13
14
15
16
17
18
19
20
21
22
23
24
25
26
27
28
29
30
31
32
33
34
35
36
37
38
39
40
41
42
43
44
45
46
47
48
49
50
51
52
如果觉得每次导入特定异常类比较麻烦,我们可以将其设置为global全局变量
/core/init.js
 // 将异常处理类设置为全局变量
  static initException() {
    const errors = require("./http-exception");
    global.errs = errors;
  }
  // 初始化配置时调用此函数
   static initCore(app) {
    InitManager.app = app;
    InitManager.initRouter();
    InitManager.initException();
  }

// 在抛出异常时无需在引入模块,按以下方法直接调用即可
const err = new global.errs.ParameterException();
// 抛出错误
throw err;
2
3
4
5
6
7
8
9
10
11
12
13
14
15
16
17
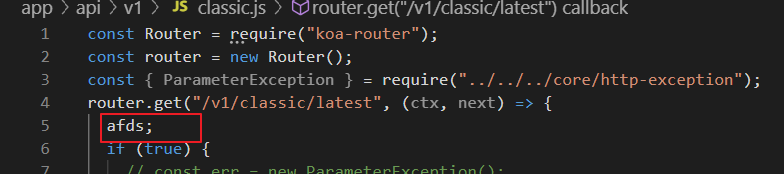
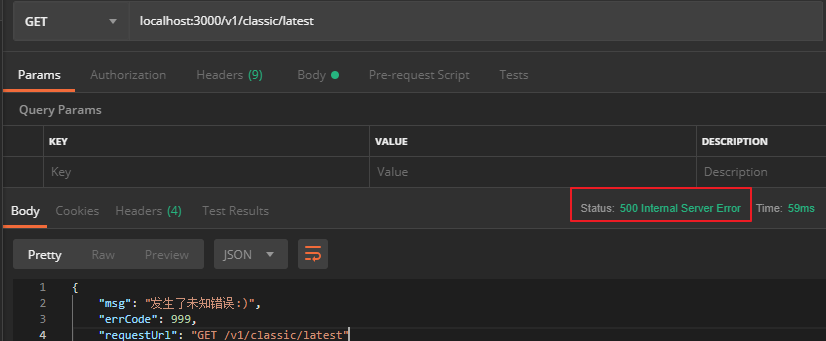
针对未知错误我们直接做以下处理:
/mideware/exception.js
const catchError = async (ctx, next) => {
  try {
    await next();
  } catch (error) {
    // 判断错误是否是已知错误
    if (error instanceof ParameterException) {
      ctx.body = {
        msg: error.msg,
        errorCode: error.errorCode,
        requestUrl: `${ctx.method} ${ctx.path}`
      };
      ctx.status = error.code;
    } else {
      // 是未知错误
      ctx.body = {
        msg: "发生了未知错误:)",
        errCode: 999,
        requestUrl: `${ctx.method} ${ctx.path}`
      };
      ctx.status = 500;
    }
  }
};
module.exports = catchError;
2
3
4
5
6
7
8
9
10
11
12
13
14
15
16
17
18
19
20
21
22
23
24
25
则在相应的接口发生未知错误时,就会出现提示: